Introduction
Ensuring the safe disposal of sharps is a critical concern in healthcare settings due to the serious consequences associated with needlestick injuries. This guide provides a clear, step-by-step approach to installing a sharps container wall mount bracket, equipping healthcare professionals with essential knowledge to enhance safety and compliance. However, if the installation is rushed or improperly executed, significant risks may arise. The following instructions will clarify the installation process while highlighting crucial safety measures that can prevent accidents and ensure adherence to regulatory standards.
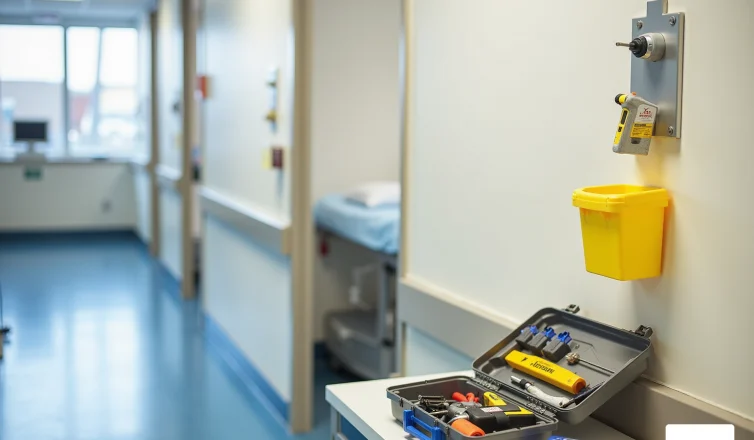
Gather Required Tools and Materials
To ensure a seamless setup of your disposal wall mount support, it is essential to gather the appropriate tools and materials beforehand. This preparation streamlines the installation process and , particularly concerning .
Tools Needed:
- Power drill with appropriate drill bits to securely fasten the bracket.
- Screwdriver (Phillips or flathead, depending on the screws).
- Level to ensure proper alignment and prevent accidents.
- Measuring tape for accurate placement, ensuring compliance with recommended heights.
- Pencil or marker for marking installation points.
- Stud finder if mounting on drywall.
Materials Required:
- Wall mount bracket designed for your specific .
- Screws and anchors, typically included with the bracket.
- Sharps container itself.
It is crucial to mount the sharps container at the NIOSH recommended height of 52-56 inches from the lid to the floor. This height reduces the risk of needlestick injuries and promotes safe disposal techniques. Additionally, before producing, storing, or removing , verify compliance with local regulations. For instance, Michigan mandates within 90 days. At Superior Medical Waste Disposal, our biohazard waste is autoclaved and shredded to reduce volume by 70% before disposal, ensuring adherence to .
Having these tools and materials ready will facilitate a successful installation, minimizing the risk of accidents and ensuring compliance with . Regular evaluations of the container holder are essential to ensure it remains securely attached and to inspect for any deterioration or damage. is vital, as loose supports can lead to dangerous situations. Following best practices, such as using a power drill for installation and positioning the bracket at eye level, will further enhance the efficiency of your disposal system.

Choose the Ideal Location for Installation
Choosing the appropriate location for your waste receptacle is crucial for ensuring safety and compliance with . To achieve this, consider the following guidelines:
- Evaluate Accessibility: Position the receptacle within arm’s reach of areas where needles are used. This significantly reduces the risk of injury during disposal. Ensure that the is easily accessible to staff and placed as close as possible to the areas where needles are utilized.
- Consider Height: In line with NIOSH recommendations, install the unit at a and 38 to 42 inches for seated workstations. Accurately measure and mark this height on the wall to facilitate proper installation.
- Avoid Obstructions: Ensure that the surrounding area is free from obstacles, allowing for easy access and safe disposal of needles without hindrance.
- Check Wall Type: When using a sharps container wall mount bracket for mounting on drywall, use a stud finder to locate wall studs for secure installation. For solid surfaces, confirm that they can support the weight of the vessel when filled.
- : Verify that the , , and properly labeled as mandated by OSHA. Additionally, ensure that your practices align with Ohio EPA recommendations for , including the use of a sharps container wall mount bracket. Keep the vessel upright during use and change it regularly to prevent overfilling.
By following these guidelines, you can ensure that the disposal unit is both accessible and compliant with , thereby enhancing the safety of staff and patients while adhering to the regulations set forth by the Ohio EPA. Superior Medical Waste Disposal provides , including the , ensuring that your facility remains compliant with all necessary regulations.

Install the Wall Mount Bracket Securely
To ensure the safe and effective installation of your , follow these essential steps:
- Mark the Drill Points: Begin by using a level to indicate the support’s position on the wall. Ensure it is straight and at the recommended height of 52 to 56 inches from the floor for standing users, or 38 to 42 inches for seated users.
- Drill Holes: Utilize a power drill to create holes at the marked points. If your installation requires anchors, ensure the holes match the size of the anchors for optimal support.
- Insert Anchors (if needed): For drywall or hollow walls, insert wall anchors into the drilled holes to enhance stability and prevent the support from pulling away from the wall.
- Attach the Support: Align the support with the drilled holes and secure it using screws. Tighten the screws securely to ensure the support remains stable and can withstand regular use.
- Double-Check Stability: After installation, gently tug on the support to confirm it is securely attached to the wall. This minimizes the risk of accidents and ensures .
Chris Earl, a Sales Support Team Member, emphasizes, “In this short video, I demonstrate how to fix a bracket to a wall, ensuring that you have a secure method of holding your item in place and well out of harm’s way for any high traffic areas in your working environment.”
By following these guidelines, you will successfully install your using the sharps container wall mount bracket, significantly lowering the risk of injuries and ensuring adherence to . Remember, can lead to severe environmental contamination and public health risks, making secure installation crucial. Additionally, following the Ohio EPA regulations for , including proper storage and disposal practices, is essential for healthcare facilities to maintain compliance and safeguard public health. , including needles, must be kept in distinctly marked receptacles to avoid incidents and ensure appropriate management.

Attach the Sharps Container to the Bracket
After securely installing the wall mount bracket, follow these steps to attach the :
- Align the by positioning the sharps holder over the mounted support, ensuring that it aligns with the locking mechanism, if applicable. The sharps container wall mount bracket is essential for safe disposal. Secure the Unit: Depending on the design, either slide the unit onto the sharps container wall mount bracket until it clicks into place or use screws to fasten it securely.
- Check for Stability: Gently tug on the vessel to confirm it is . This step is crucial, as stability directly impacts with set forth by the Ohio EPA.
- Label the Receptacle: If not already labeled, ensure the receptacle is clearly marked as a disposal unit for needles. and compliance with health and safety standards.
By following these steps, you will have successfully set up your disposal container, ensuring it is ready for safe and compliant use. Regular audits and have shown that and labeling significantly reduce the risk of needle-stick injuries (NSIs), which are reported to affect thousands of healthcare workers annually. For instance, compliance rates improved from 44% in 2019 to 84% in 2020, highlighting the importance of following established protocols. Secure disposal practices not only protect staff but also contribute to a safer healthcare environment. Additionally, it is advisable to for further insights into best practices, in line with Ohio EPA regulations. Remember, small generators must maintain a monthly generation log of infectious waste, and all infectious waste should be treated using methods such as autoclaving to ensure compliance with Ohio EPA regulations.

Conclusion
Installing a sharps container wall mount bracket is essential for ensuring safe disposal practices in healthcare settings. This critical step minimizes risks associated with needlestick injuries and helps maintain compliance with vital regulations. A proper installation not only protects healthcare workers but also fosters a culture of safety and responsibility in managing biohazard waste.
Key considerations include:
- Gathering the necessary tools and materials
- Selecting a suitable location that meets safety standards
- Ensuring a secure installation of both the bracket and sharps container
Each step, from marking drill points to verifying stability, is crucial for achieving a successful setup. Adhering to guidelines from organizations like OSHA and the Ohio EPA reinforces the importance of effective waste management in safeguarding public health.
The significance of a well-installed sharps container cannot be overstated. It serves as a cornerstone of safety in healthcare facilities, significantly reducing the risk of injuries and ensuring responsible handling of biohazard waste. By committing to these best practices, healthcare providers can create a safer environment for both staff and patients, highlighting the critical nature of proper sharps disposal.
Frequently Asked Questions
What tools are needed to install a disposal wall mount support?
The tools needed include a power drill with appropriate drill bits, a screwdriver (Phillips or flathead), a level, a measuring tape, a pencil or marker, and a stud finder if mounting on drywall.
What materials are required for the installation?
The materials required are a wall mount bracket designed for the specific sharps container, screws and anchors (typically included with the bracket), and the sharps container itself.
What is the recommended height for mounting the sharps container?
The sharps container should be mounted at the NIOSH recommended height of 52-56 inches from the lid to the floor.
Why is it important to mount the sharps container at the recommended height?
Mounting the sharps container at the recommended height reduces the risk of needlestick injuries and promotes safe disposal techniques.
What should be verified before producing, storing, or removing biohazard waste?
It is essential to verify compliance with local regulations regarding the removal of biohazard waste.
What specific regulation does Michigan have regarding biohazard waste removal?
Michigan mandates that biohazard waste must be properly removed by a licensed medical waste hauler within 90 days.
How does Superior Medical Waste Disposal manage biohazard waste?
Superior Medical Waste Disposal autoclaves and shreds biohazard waste to reduce its volume by 70% before disposal, ensuring adherence to best practices in biohazard management.
Why is it important to regularly evaluate the container holder?
Regular evaluations are essential to ensure the holder remains securely attached and to inspect for any deterioration or damage, as loose supports can lead to dangerous situations.
What installation practices enhance the efficiency of the disposal system?
Best practices include using a power drill for installation and positioning the bracket at eye level to enhance the efficiency of the disposal system.